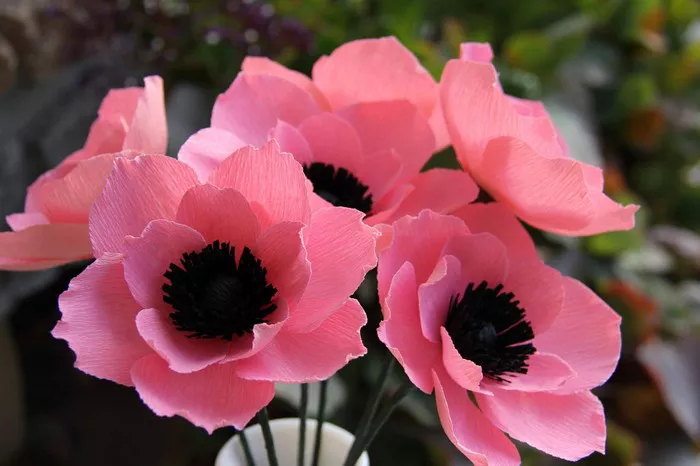
Paper flowers are a timeless and elegant addition to any occasion or space, offering a touch of nature’s beauty that lasts indefinitely. Among the myriad of paper flower designs, the anemone stands out for its delicate petals and striking center. Creating paper anemone flowers is a delightful craft project that allows you to indulge your creativity while producing stunning decorative pieces. In this comprehensive guide, we will walk you through the materials needed and provide a step-by-step tutorial to help you craft your own beautiful paper anemone flowers.
Materials Needed:
1. Colored craft paper: Choose high-quality craft paper in various shades to replicate the natural colors of anemone flowers. Opt for colors such as white, pink, purple, or red for the petals, and black or yellow for the center.
2. Floral wire: This will serve as the stem for your paper flowers. Thin floral wire is ideal for creating delicate stems.
3. Floral tape: Use floral tape to secure the petals and stem together, providing stability and a polished finish.
4. Scissors: Sharp scissors are essential for cutting the paper into precise shapes.
5. Glue: A strong, clear-drying craft glue will be used to assemble the different components of the paper anemone flower.
6. Anemone flower template: While optional, using a template can help ensure uniformity and accuracy in cutting the paper petals and center.
7. Pencil: A pencil will be used to trace the template onto the craft paper before cutting.
8. Round-nose pliers (optional): These pliers are useful for bending the ends of the floral wire to create a more realistic-looking center for the anemone flower.
Step-by-Step Guide:
Step 1: Prepare Your Materials
Gather all the materials listed above in a well-lit and comfortable workspace. Ensure that your scissors are sharp and that you have ample space to work without clutter.
Step 2: Cut Out Petal Shapes
Using your chosen colors of craft paper, trace and cut out the petal shapes for the anemone flower. You can either use a template or freehand the shapes for a more organic look. An anemone typically has 8 to 12 petals, so cut out enough petals to create a full and lush flower.
Step 3: Form the Flower Center
Cut a small circle from the black or yellow craft paper to serve as the center of the anemone flower. This center will anchor the petals and give the flower its distinctive appearance. If desired, use round-nose pliers to gently curl the edges of the circle to add dimension.
Step 4: Shape the Petals
Take each petal and gently curl the edges using your fingers or a round object like a pen or pencil. This will give the petals a natural and lifelike appearance. Be careful not to crease the paper as you shape the petals.
Step 5: Assemble the Flower
Begin assembling the flower by layering the petals around the center in a circular fashion. Start with the larger petals on the outermost layer and gradually work your way inward with smaller petals. Arrange the petals in a slightly overlapping manner to create depth and dimension.
Step 6: Secure the Petals
Once you are satisfied with the arrangement of the petals, use a small amount of glue to secure them together at the base. Hold the petals in place for a few seconds to allow the glue to set.
Step 7: Attach the Stem
Cut a piece of floral wire to your desired length for the stem of the anemone flower. Apply a dab of glue to the bottom of the flower and insert the floral wire into the center, ensuring it is securely attached. Allow the glue to dry completely before proceeding.
Step 8: Wrap the Stem
Wrap floral tape around the base of the flower where it meets the stem, covering any exposed glue and providing additional support. Continue wrapping the floral tape along the length of the stem until you reach the desired thickness.
Step 9: Finishing Touches
Once the glue and floral tape have dried completely, your paper anemone flower is complete! If desired, you can further embellish the flower with additional details such as leaves or glitter for added flair.
Step 10: Display Your Creation
Find the perfect spot to showcase your handmade paper anemone flower, whether it’s in a vase as part of a floral arrangement, attached to a gift as a decorative accent, or incorporated into a craft project or home decor display.
Conclusion
Creating paper anemone flowers is a rewarding and enjoyable craft that allows you to express your creativity while adding a touch of natural beauty to any setting. With just a few simple materials and a bit of patience, you can create stunning paper flowers that will be admired for years to come. So gather your supplies and let your imagination bloom as you embark on this delightful crafting adventure!


